Introduction
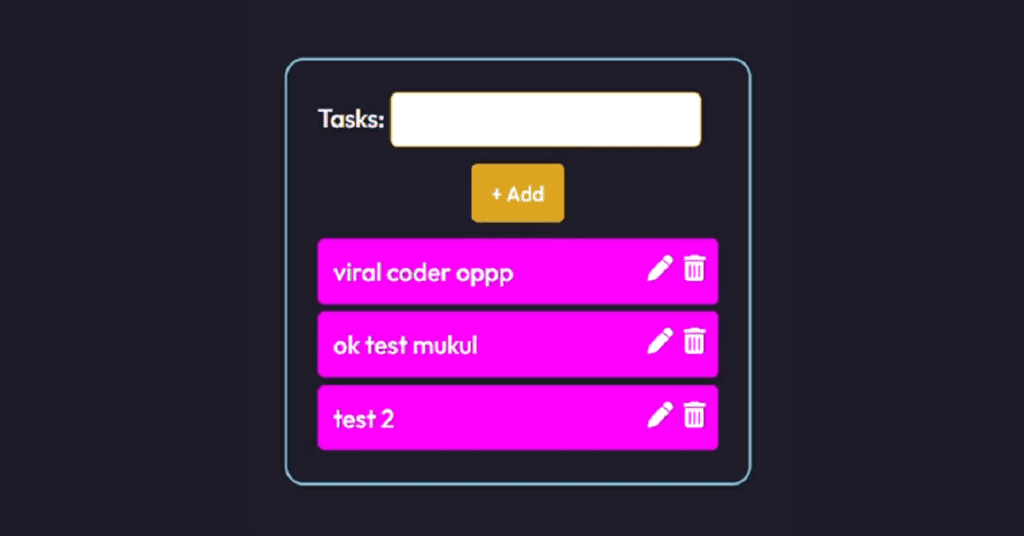
Constructing a Feature-Rich React Todo App is a pivotal exercise for any web developer. This guide, titled “React Todo App Easy Tutorial,” will lead you through the code structure, functionality, and styling of the React Todo app. We’ll delve into each component, examine their functionalities, and grasp the rationale behind the styling choices. Dive in for an in-depth exploration of React application development.

Project Structure
Before delving into the code, let’s gain an overview of the project structure:
- App.js: Main entry point for the React app.
- App.css: Stylesheet for the main application.
- Todo.jsx: Manages the Todo list and user input.
- Todo.css: Stylesheet for the Todo component.
- Toastr.jsx: A custom hook for displaying toast notifications.
Setting up the App
App.js
In App.js, we kick off the application by importing the necessary dependencies and components. The App function component is the main driver, rendering the Todo component and incorporating the ToastContainer for notifications.
import "./App.css";
import Todo from "./components/Todo";
import { ToastContainer } from "react-toastify";
import "react-toastify/dist/ReactToastify.css";

function App() {
  return (
    <>
      <Todo />
      <ToastContainer
        position="top-center"
        autoClose={2000}
        hideProgressBar={false}
        newestOnTop={false}
        closeOnClick
        rtl={false}
        pauseOnFocusLoss
        draggable
        pauseOnHover
        theme="dark"
      />
    </>
  );
}

export default App;Styling with CSS
App.css
In App.css, global styles are applied using the * selector. The Outfit font is imported from Google Fonts, ensuring a consistent font family throughout the application.
@import url("https://fonts.googleapis.com/css2?family=Outfit:wght@500&display=swap");
* {
  margin: 0;
  padding: 0;
  box-sizing: border-box;
  font-family: "Outfit", sans-serif;
}Todo Component
Todo.jsx
The Todo component, the heart of the application, manages the Todo list and user input. It incorporates state variables, such as todo for capturing input, and items_arr for storing the list of items. The useEffect hook retrieves saved items from session storage on component mount.
import { useEffect, useState } from "react";
import "./Todo.css";
import Toastr from "../hooks/Toastr";

const notify = Toastr();

function Todo() {
  const [todo, setTodo] = useState("");
  const [items_arr, setItems_arr] = useState([]);

  useEffect(() => {
    const itemArr = JSON.parse(sessionStorage.getItem("todo"));
    if (itemArr) {
      setItems_arr(itemArr);
    }
  }, []);

  return (
    <>
      <div className="container">
        <form action="#">
          <label htmlFor="task">Tasks: </label>
          <input
            id="task"
            className="todo-list"
            type="text"
            value={todo}
            onChange={(e) => setTodo(e.target.value)}
          />
          <div className="add-center">
            <button
              className="addBtn"
              onClick={(e) => addToList(e)}
              type="button"
            >
              + Add
            </button>
          </div>
        </form>
        <div id="list-data">
          <TodoList
            items_arr={items_arr}
            setItems_arr={setItems_arr}
          />
        </div>
      </div>
    </>
  );

  function addToList(e) {
    if (todo !== "") {
      let updatedArr = [
        ...items_arr,
        { item: todo, edited: false, editedData: todo },
      ];
      setItems_arr(updatedArr);
      setTodo("");
      sessionStorage.setItem("todo", JSON.stringify(updatedArr));
    } else {
      notify("Please Enter Anything !!");
    }
  }
}TodoList Component
TodoList.jsx
The TodoList component, a child of Todo, is responsible for rendering individual Todo items. It maps through the items_arr array, rendering each Todo item along with options for editing and deleting.
function TodoList({
  items_arr,
  setItems_arr,
}) {
  return (
    <>
      {items_arr?.map((data, index) => {
        return (
          <div key={index} className="list">
            <span>{data?.item}</span>
            <i
              onClick={() => removeListData(index)}
              className="fa fa-light fa-trash"
            ></i>
            <i
              onClick={() => editBtnClicked(index)}
              className="fa fa-light fa-pen"
            ></i>
            {data.edited ? (
              <div className="flex">
                <input
                  value={data.editedData}
                  className="edited-text"
                  type="text"
                  onChange={(e) => handleChange(e, index)}
                />
                <button onClick={() => itemEdited(index)} className="done">
                  Done
                </button>
              </div>
            ) : (
              <></>
            )}
          </div>
        );
      })}
    </>
  );

  function editBtnClicked(index) {
    let updatedList = [...items_arr];
    updatedList[index].edited = true;
    setItems_arr(updatedList);
  }
  function handleChange(e, index) {
    let updatedList = [...items_arr];
    updatedList[index]["editedData"] = e.target.value;
    setItems_arr(updatedList);
  }
  function itemEdited(index) {
    if (items_arr[index].editedData) {
      let updatedList = [...items_arr];
      updatedList[index].item = updatedList[index].editedData;
      updatedList[index].edited = false;
      setItems_arr(updatedList);
      sessionStorage.setItem("todo", JSON.stringify(updatedList));
    } else {
      notify("Please Enter Anything !!");
    }
  }
  function removeListData(index) {
    const newArr = items_arr.filter((item, ind) => ind !== index);
    setItems_arr(newArr);
    sessionStorage.setItem("todo", JSON.stringify(newArr));
  }
}
export default TodoList;Styling Todo Component
Todo.css
In Todo.css, the styling for the Todo component is defined. It includes the appearance of the input form, add button, and the overall container.
.container {
  position: absolute;
  left: 50%;
  top: 50%;
  transform: translate(-50%, -50%);
  box-shadow: 7px 7px 33px 0 rgba(0, 0, 0, 0.25),
    -8px -8px 12px 0 rgba(255, 255, 255, 0.3);
  min-height: 200px;
  min-width: 300px;
  max-width: 300px;
  padding: 20px;
  border-radius: 12px;
  overflow-wrap: break-word;
}
.todo-list {
  padding: 8px;
  border: 1px solid goldenrod;
  border-radius: 5px;
  width: 200px;
}
.addBtn {
  padding: 10px;
  background-color: goldenrod;
  color: white;
  border: none;
  width: 60px;
  border-radius: 4px;
  cursor: pointer;
}
.add-center {
  margin-top: 10px;
  display: flex;
  justify-content: center;
}
#list-data {
  margin-top: 10px;
}
.list {
  padding: 10px;
  background-color: Fuchsia;
  color: white;
  margin-top: 5px;
  border-radius: 4px;
}
.fa-pen {
  float: right;
  cursor: pointer;
  position: relative;
  right: 5px;
}
.fa-trash {
  float: right;
  cursor: pointer;
  position: relative;
  left: 2px;
}
.done {
  background-color: goldenrod;
  color: white;
  border: none;
  padding: 5px;
  border-radius: 3px;
  margin-left: 4px;
  cursor: pointer;
  margin-top: 5px;
}
.edited-text {
  background-color: Fuchsia;
  color: white;
  border: 1px solid goldenrod;
  border-radius: 5px;
  padding: 5px;
  margin-top: 5px;
}
.flex {
  display: flex;
}Conclusion
This React Todo app offers a hands-on experience with React components, state management, and styling. The use of session storage ensures data persistence, while toast notifications enhance the user experience. As you explore and enhance this Todo app, consider additional features such as due dates, categorization, or cloud synchronization. The journey of building a Todo app serves as a solid foundation for diving deeper into React and front-end development.
Happy coding!

